How to migrate from create-react-app to Next.js
In this article I’m going to walk you through the steps I took to migrate my simple React landing page to Next.js and what to watch out for.
It’s super easy and can be done in an afternoon. Next.js is a lightweight React framework, so it’s not oranges to apples. It’s opinionated though, which means a few things are a little bit different. But first, let’s explore the “why”.
Why should you convert a React app to Next.js?
The short answer: SEO.
I built the landing page for my API project imgregex: Extract machine readable text from images in React, because I had a starter project with everything I needed at hand. Well, and I also feel confident in React, so building a quick landing page for my prototype with it was the logical choice.
But React apps don’t make for great landing pages, I found out. Until recently Google didn’t even crawl Single Page Applications (short SPA’s). Now they do, but Google admits they still have trouble to fully process JavaScript. That’s not all, it might even take them a couple of days longer.
That doesn’t matter much for a WebApp that sits behind a login and isn’t crawled by Google anyway. But for public facing webpages like landing and product pages this is a big deal. Or should I say dealbreaker?
No surprise here, the higher you rank in Google and other major search engines, the more traffic you get. That means the smallest gains in SEO can make a difference for your bottom line, so it’s probably best to not take any chances.
Google straight up says they will predominantly use the mobile version for indexing so the easier your page is on mobile devices in terms of payload size and processing required, the more Google will prefer your page over the alternatives. I would recommend doing a Lighthouse Test on your page. Lighthouse is run on an emulated mobile device with a 3G connection. It’s a good litmus test for how Google sees your website.
Let’s get into the nitty gritty details of migrating your react app over to Nextjs.
Step by step: Converting a CRA to Next.js
Create a new Next.js project.
First up, run this command in your terminal to create the starting point for your new app:
$ npx create-next-appIf you’re using a CSS framework, this is the moment where you’d set it up with Next.js. Me? I like using the utility-first framework TailwindCSS. This is the walkthrough I used to get it up and running quickly.
Drop your components into your Next.js project
In your fresh Next.js project you’ll already find a components folder. Use that one for all of the re-usable components.
Now you’ll want to turn your components that represent actual pages into, well, pages. That’s what the pages folder is for. Each file in pages represents a page on your website. Go ahead, put your page components there. The naming convention for pages is all lowercase. Your root page should thusly be called index.js.
Routing: React vs Next.js
While plain React either renders as a true Single Page Application—much like an phone app on the web—or renders routes with the help of a router component, Next.js ships with an internal routing mechanism. It mirrors the file paths to your pages and even allows for dynamic routes (slugs, id’s and such).
With that in mind you need to create the directory structure that mirrors your router configuration. Given its popularity, you were probably using react-router, so you could do a project wide search for <Route and migrate them one by one.
With the page setup out of the way you now need to change your Link’s throughout your project to native ones. As I said earlier, Next.js comes with a routing solution pre-packaged and these have a slightly different syntax.
First, replace every import of react-router’s Link
import { Link } from "react-router-dom";with the equivalent in Next.js
import Link from 'next/link'Now, the syntax is as follows: <Link to="/destination/path">Link Caption</Link> becomes <Link href="/destination/path">Link Caption</Link>. Essentially just switching out to with href.
If, however, you were using styles and CSS classes on a Link, you have to change the code a little bit more. Links in Next.js are simply decorators and only accept one prop: href. Hence you have to put your styles and classes on an anchor tag directly and wrap it with the Link decorator like so:
<Link href="/destination/path">
  <a className="underline text-gray-600">Link Caption</a>
</Link>
CSS
The steps in this section will be different for everybody reading this. There’s a myriad ways to write CSS. Be it one vanilla CSS file, SASS, styled-components or using one of the thousand CSS frameworks.
I encourage you to check out Next’s built-in CSS support to evaluate if you want to use their styled-jsx approach. In any other case, you can most likely make your current approach work in Next.js as well.
In my case, I was using emotion with a Tailwind macro via the css prop. It didn’t really give me any noteworthy benefits, so I dumped it and replaced all css props with good ol’ className’s. Not only does it make my code a wee bit cleaner, it also doesn’t bundle all Tailwind classes on an element into one autogenerated, nondescript class. I like that when people inspect a page I built and want to know what Tailwind classes I used to achieve a layout, they now can.
Assets: React vs Next.js
In the meantime you might have already tried to start up a local dev server to check if anything is at all showing, with
$ npm run devand seen an error like this one:
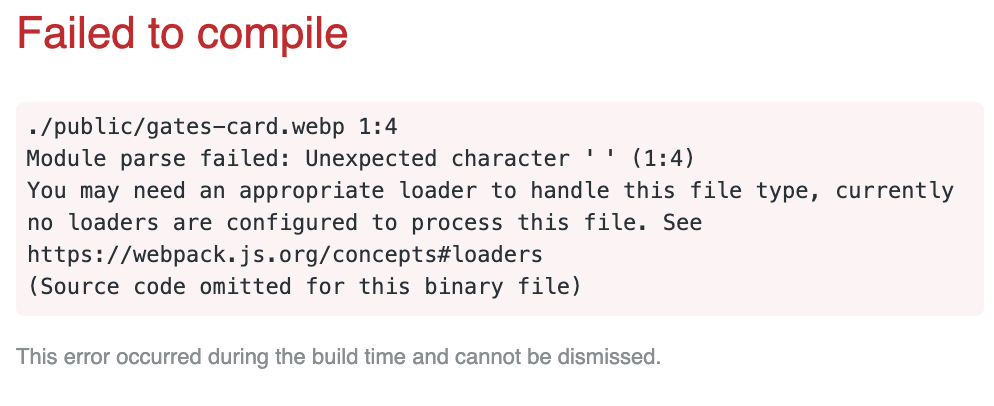
Yep, me too. While in React you can simply import assets like images, vectors and fonts straight away, not so in Next.js. You will have to add a webpack loader for that type of asset to your next.config.js first.
For image files I’m using next-images. Just go to your next.config.js file if you already have one, or create one in the root of your project now. If you just had to create a config file these two lines of code are all you need:
const withImages = require('next-images')
module.exports = withImages()
Should you already have a config for, say, your CSS framework of choice you might be wondering how to also use next-images on top of that. Just wrap the current config in it. Here’s my config for example:
const withCSS = require('@zeit/next-css')
const withImages = require('next-images')

module.exports = withImages(
  withCSS({
    target: 'serverless'
  })
)
As you can see, just wrap and wrap and… you get the point, I guess.
React Hooks
You’re probably wondering if you can use that sweet React hook goodness. I know, I was. Thankfully hooks are supported out of the box, so nothing to do here.
Where to put header and meta information?
When working with React, you have an html file as your main entry point. Great, an HTML file where we can dump our meta information and not worry about a thing. Next.js is different in that aspect. There’s no static html wrapper your app will be rendered into. At least not for you to configure with a text editor. Not to worry, though, Next’s solution is actually better.
You can put header information right into your pages. That allows you to easily configure meta descriptions for every page, which is what you’d want in terms of SEO anyway.
Alright, almost there. There’s one more thing you might run into.
ReferenceError: window is not defined
If you configure Next.js to run in a SSR configuration and you’re using window in your code—or one of your packages does—then you’ll have to make Next aware that this package needs to be dynamic. The reason this error pops up is this: when html is rendered on the server (remember, SSR stands for server-side rendering), there’s no instance of window, because, well, there’s simply none. window is only accessible on the client-side.
I ran into this with a package called react-json-view. I use it to render beautiful json in html. Here’s how to make it work:
import dynamic from 'next/dynamic'
const DynamicReactJson = dynamic(import('react-json-view'), { ssr: false })
Now, simply proceed to use that import as you’ve done before.
Conclusion
In essence, Next.js is a React framework, that’s just a little bit opinionated. This makes it very easy to migrate a React app over to Next as you’ve seen in this article. You should, hopefully, now have a running Next.js app, at least locally. There’s still a ton of optimizations and customizations you could implement and I encourage you to dive into the documentation to get a feel for the things Next.js has to offer.
As for hosting, you can either export it as a static webpage and deploy to, say, Netlify or go with ZEIT’s own hosting. Since I’m pretty invested in the AWS ecosystem, I decided to use serverless-next.js to deploy a serverless variant to AWS Edge locations and have a blazing fast server-side rendered landing page. Check it out: imgregex
Alright, this wraps it up. I hope you made it ‘til the end without a scratch.
Questions or something important missing? Get in touch on Twitter.